Sunday, 18 March 2018

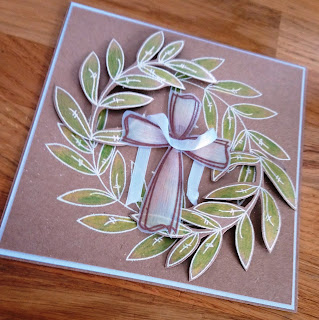
Easter Day 4 - Wreath

Well today doesn't feel very Spring like, with a thick blanket of snow everywhere! Mr Roo and the Roolets are digging a path to the Stamp machines so Mr Roo doesn't get snowed in there! Well Mr Roo is, the Roolets are making snow castles and standing shouting at the fish pond asking if the fish are cold - I'll give you a clue IT'S FROZEN!!!!!! 

Anyway how about another lovely SPRING card, just perfect for Easter!


First up trim your kraft card to measure 5.75 inch square. And in clear ink Stamp the spikey vine from the Funky Vine - Autumn stamp set, then cover with Antique White Embossing powder and heat set.


Stamp the spikey vine again onto another piece of Kraft card as before. Colour all the vines in using pencil crayons.


Cut out the two extra spikey vines leaving a small border.


Onto a piece of Vellum stamp the cross in clear ink and embossing using copper embosing powder. cut this out leave a small border.

On the reverse add some colour and shape.


Mount the stamps  5.75 inch square of Kraft onto a slighty large piece of White card, then mount onto a 6 inch square base card.

Attach the cut out vines to cover the gaps.

Around the cross drape some white ribbon and attach to the card.


Saturday, 17 March 2018

Easter Day 3 - Project Time!

Diversions!

Isn't it funny how one phone call, email, conversation changes your plans in an instant! Well as you can probably tell my Thursday plans changed and well it's now Saturday lol and I am finally getting around to sharing this really quick but so beautiful Easter gift! 


So without any further delays let's crack on...

First up you will need a un-coated tile for this project, these are available from any DIY shop and generally have a warning ticket telling you they will need sealing, I went for the natural stone colour but they do them in others, you will also need some door stops (the type you use in kitchen cabinets to stop your door slamming shut), tissue paper and some really good quality PVA!

Now we are good to start.

Find a circle that is smaller than the tile that will act as your guide and draw it onto a piece of scrap paper. 


Then draw around your tile onto the tissue paper - I always use the rough side of the tissue paper as it holds the inks a little better!

Place this over the circle and secure in place.


Using tattered rose stamp 3 Mini Funky - Rose around the circle (I turned my paper to make it easier).


Create a mask for the roses by stamp the rose 3 times on the sticky edge of a sticky note and cut them out.

Lay these over the stamped rose and Stamp your next flower, I stamped Mini Funky - Violet in stormy sky. 


Create masks and cover each stamped image.

Finally I stamped Mini Funky - Chrysanthemum using wild honey.

Create a mask again and cover the Chrysanthemum. Using a sticky note mask of the outside of the circle.


Using the outline stamp from Mini Funky - Foliage, stamp this three time into the centre of the circle using peeled paint. 

Then mask of the centre of the circle and stamp the Foliage on the outside.


Remove all the masks. The rose was a bit too pale so I added the detail stamp in victorian velvet over the top.


Select a saying I used one from this months Monthly Make and stamp this in the centre of the circle using Archival Ink (I used Sepia).


Add a foot (door stop) to each of the underside corners of the tile, this will help you when you come to seal your tile and protects your surfaces when the tile is being used.


Next trim the tissue paper so that there is about an inch border all around and place your stamp image on top of tile to see how best the image fits on the tile.


Using a strong PVA glue, coat the top of your tile.


Gently place your stamped image over the tile and press it lightly into the tile, becareful not to rub the image as it will tear easily. Also be careful not to attach the tissue paper down the edges of your tile.


Leave this to dry for a couple of minutes. Being careful not to touch the top of the tile, use a emery board to remove the excess tissue paper by running it from the top of the tile over the tissue paper the tissue paper will tear easily and fall away.


Once all the excess tissue paper has been removed apply another layer of glue around the edges and over the top, being careful not to press too hard on the tissue paper or it may tear (mine did!). If you have any cracks or crevices in your tile besure to add more PVA to those areas to make sure it is sealed.

( I couldn't get this picture the right way up - WHOOPS!!!)

When the first layer is dry add another and wait until that is dry too, then add a 3rd layer. Each layer will take longer and longer to dry.

I generally add atleast 3 layers of PVA but the more you add the stronger barrier you are creating on your tile.

Little lady caught me making this "I think my teachers would like one of those!", guess I am off to find a Teacher saying lol!

But before I do how about an offer? All of the Mini Funky flowers used in this project are available on our website, but I have also added a special offer on these little lovelies too, so hop on over to our website if you want to find out more......

Tuesday, 13 March 2018

Easter Day 2

Okay, Okay, I know I am kinda cheating with this one! Those lovely Monthly Make members amongst you will recognise this little beauty from February, but it is so nice I wanted to share it again.


So here goes......

First up cut a piece of white card 1cm smaller than a DL base card.

Using the Distress Panel POLY PLATE from February's Monthly Make, give it a quick wipe with a baby wipe then start to load up the colour.

Cover the entire POLY PLATE with fossilised amber, then the top 2/3 with carved pumpkin and the top 1/3 with fired brick. Spritz with water until the ink turns fluid. Stamp this onto the piece of white card. Leave it to dry.

When the Sunset is dry stamp the Spring Flower Silhouettes #1 & 2 across the sunset in brushed corduroy. (After many requests the Spring Flower Silhouettes are also available in Minis and Large!) 

On a scrap piece of white card Stamp your saying with clear in and emboss using Vintage Black embossing powder and heat to set.

Mat the sunset and the sentiment onto a slightly bigger piece of black card. Then around the Sunset piece attach a piece of yellow/gold ribbon.

Attach the sunset to the front of a DL base card and stick the sentiment over the ribbon.

So how about another Easter offer? Well I can't discount our Monthly Make Stamps sets any more as we don't have many of February's left and if I was to add any more stamps to Mr Roo's making list he might just say a few naughty words!!!!

So instead how about another Poly Plate offer???????

Sunday, 11 March 2018

Easter

I know its Mother's day today and we are celebrating those very important ladies in our lives (and rightly so too!) but, I thought I would sneak away and have some me time! 

Easter is a big deal here at Crafty Roo HQ, my two little people love the magic and excitement of the Easter hunt - I can't call it an Easter EGG hunt as they don't really eat Easter Eggs I generally end up tucking into them between Summer and Christmas. So our Easter hunt has clues on how to find the prizes and all sorts of silly things to find and lots of giggles and laughter.

This year I thought I would get my act together, as I am always making cards and gifts last minute and come up with some quick and easy card (and gift ideas) for Easter and share them hopefully every other day between today and Easter!

So today's card is really quick and simple to make and more importantly your can colour it however you like.....


First up I cut a piece of our STUCCO card to measure 7.5 inch square.

I then wiped over the Curved Cross POLY PLATE with a baby wipe and inked up the whole thing with squeezed lemonade, then the centre with picked raspberry.


And then in the very centre with peacock feathers.


Spritzed it and placed the cross onto the STUCCO Card over the the left hand side.

I lifted the POLY PLATE and allowed it to dry. 


Yes you can use ordinary card to do this, but, the STUCCO with keep the colours brighter and will not bleed or muddy as much as normal card.

When the Cross was dry I stamp He has Risen! sentiment using Sepia Archival Ink.


The STUCCO was mounted onto brown card and then onto and 8 inch square base card.

I added a bow made out of string to the centre of the cross.


I did say this was a quick card! But a fab one for mass producing or just having fun with the little ones. So how about an offer on the stamps I have used? Of course How about the POLY PLATE and He has Risen for £9.50 and don't tell Mr Roo but I will also throw in some STUCCO Card too!!!

For this offer check out our website