Monday 24 December 2012

Kiddies cards!

I love making kiddies Christmas cards! I really go to town on them and this year was no exception.


I made three of the Santas in total!


Little Lady has a Squirrel obsession at the moment, so it only seemed right she had a squirrel card!

I think this one has to be my favourite card it turned out lovely!

All the toppers are from my ScrapChick. and the text is from Dimension Stamps.

Sunday 23 December 2012

More presents

Here's a couple of necklaces I whipped up.


I love the colours in this one it reminds me of summer! Good job as it's for my mother-in law who lives in Cyprus!


This next one is for my Sister-in-law, I think I am going to have to make another one of these for me!

Thursday 20 December 2012

Tree Skirt

It's finished!!!!
 
After many hours of sewing and pinning and, well you get the picture I actually finished it! I am so pleased with it!


Five minutes after this photo was taken, it was put under the tree. Or as Little Lady said "we put the trees feet to bed" and the cat curled up and fell asleep!
 
How's that for a fancy cat bed!

Wednesday 19 December 2012

Dimension Stamps: Flower Powered

This lovely door hanger was made using the new Flower Powered Stamped set from Dimension Stamps (stamp ref: 2400075a).


It is so quick to make, it even surprised me!

For this door hanging I used the following stamp sets from Dimension Stamps:
  • Flower Powered (stamp ref: 2400075a)
  • Sew Creative (stamp ref: 2400073a)
  • Plain Alphabet (stamp ref: 1801012A)
  • Plain Alphabet Lowercase (stamp ref: 1801014A)
I started by cutting a piece of Kraft card to fit a 5 x 7 inch piece of Grungeboard (I used Grungeboard as it is more flexible than chipboard). Then I stamped around the edge using the double stitch (Sew Creative) and distressed it lightly, and stuck it to the Grungeboard.
Then onto a white piece of card I stamped the flowers and swirls (from Flower Powered) in the bottom corner and the butterfly (also from Flower Powered) in the opposite corner. Next I coloured it in using distress inks. Once I was happy with it I stamped around the edge using the double stitch (Sew Creative) and distressed it lightly. This was then attached to the Kraft card.
Next I added two blue eyelets and some ribbon.
Onto the left over pieces of white card I stamped "Clare" using the alphabet stamp sets, then I over stamped them with the flower and swirls stamp. These were then coloured and cut out.
To finish it off I attached "Clare" and added glossy accents.

Monday 17 December 2012

Dimension Stamps: Flower Powered

This bag charm was made using the Flower Powered stamp set from Dimension Stamps (stamp ref: 2400075a).

It was really easy to make all I did was stamp the butterfly onto a peice of chipboard and cut it out making sure I left enough room to attach a eyelet.

Next I tore strips from an old book and distressed them. These were then stuck onto the chipboard (do one side at a time and make sure you cut it out after each side!) I then re stamped the butterfly, coloured it in and distressed around the edges.

I then made a hole for the eyelet and coated the whole thing in glaze. Once it was dry I added a eyelet and large jump ring.

To finish it off I used a large clasp, some chain, beads and a couple of embelishments.

I am really pleased with how it turned out, it will make brighten up any bag!


Sunday 16 December 2012

Christmas Card

Merry Christmas!
Well it's about time I got on with my Christmas cards, this is one of  uummmmm I  have lost count how many I made!


I used A Festive Night by Lantern Light (stamp ref: 2400068a) and Word Perfect at Christmas Time (stamp ref: 1803063a) from Dimension Stamps.
So simple to make but I love how they turned out!

Saturday 15 December 2012

Dimension Stamps: Flowered Powered

Flower Powered (stamp ref: 2400075a) is a new stamp set from Dimension Stamps. I had great fun playing with these stamps!


This card is so simple to make, but took forever to dry!
All I did was cut a piece of white card and stamped the "love me, loves me not" stamp from the set along the bottom and embossed it with copper embossing powder, then in the top right corner stamped "Flower Power" and embossed with copper embossing powder. Around the remaining edges I stamped the straight stitch (from Sew Creative stamp ref: 2400073a). I then distressed around the edges and added colour to the flowers.
Next I stamped the bike onto acetate and cut around it leaving a long tab to connect it to the card. I then attached the tab to the stamped card and matted it onto Copper mirricard and added copper brads to the corners.
Using a plain white A5 card I distressed it and attached the stamped image and acetate.
Finally on the back of the acetate I added stickles and left it to dry, mine took over night!


Friday 14 December 2012

Dimension Stamps: Flower Powered

I can't take all the credit for this card as my little lady inspired it! She was sat painting (or more accurately covering the kitchen in paint!) and she was having such fun just sploshing the paint around, I thought I wanted to do that, so I did!


For this card I used the following Dimension Stamps sets: Flower Powered (stamp ref: 2400075a),  Sew Creative (stamp ref: 2400073a) and Grand Word Perfect 2 (stamp ref: 1803069a).

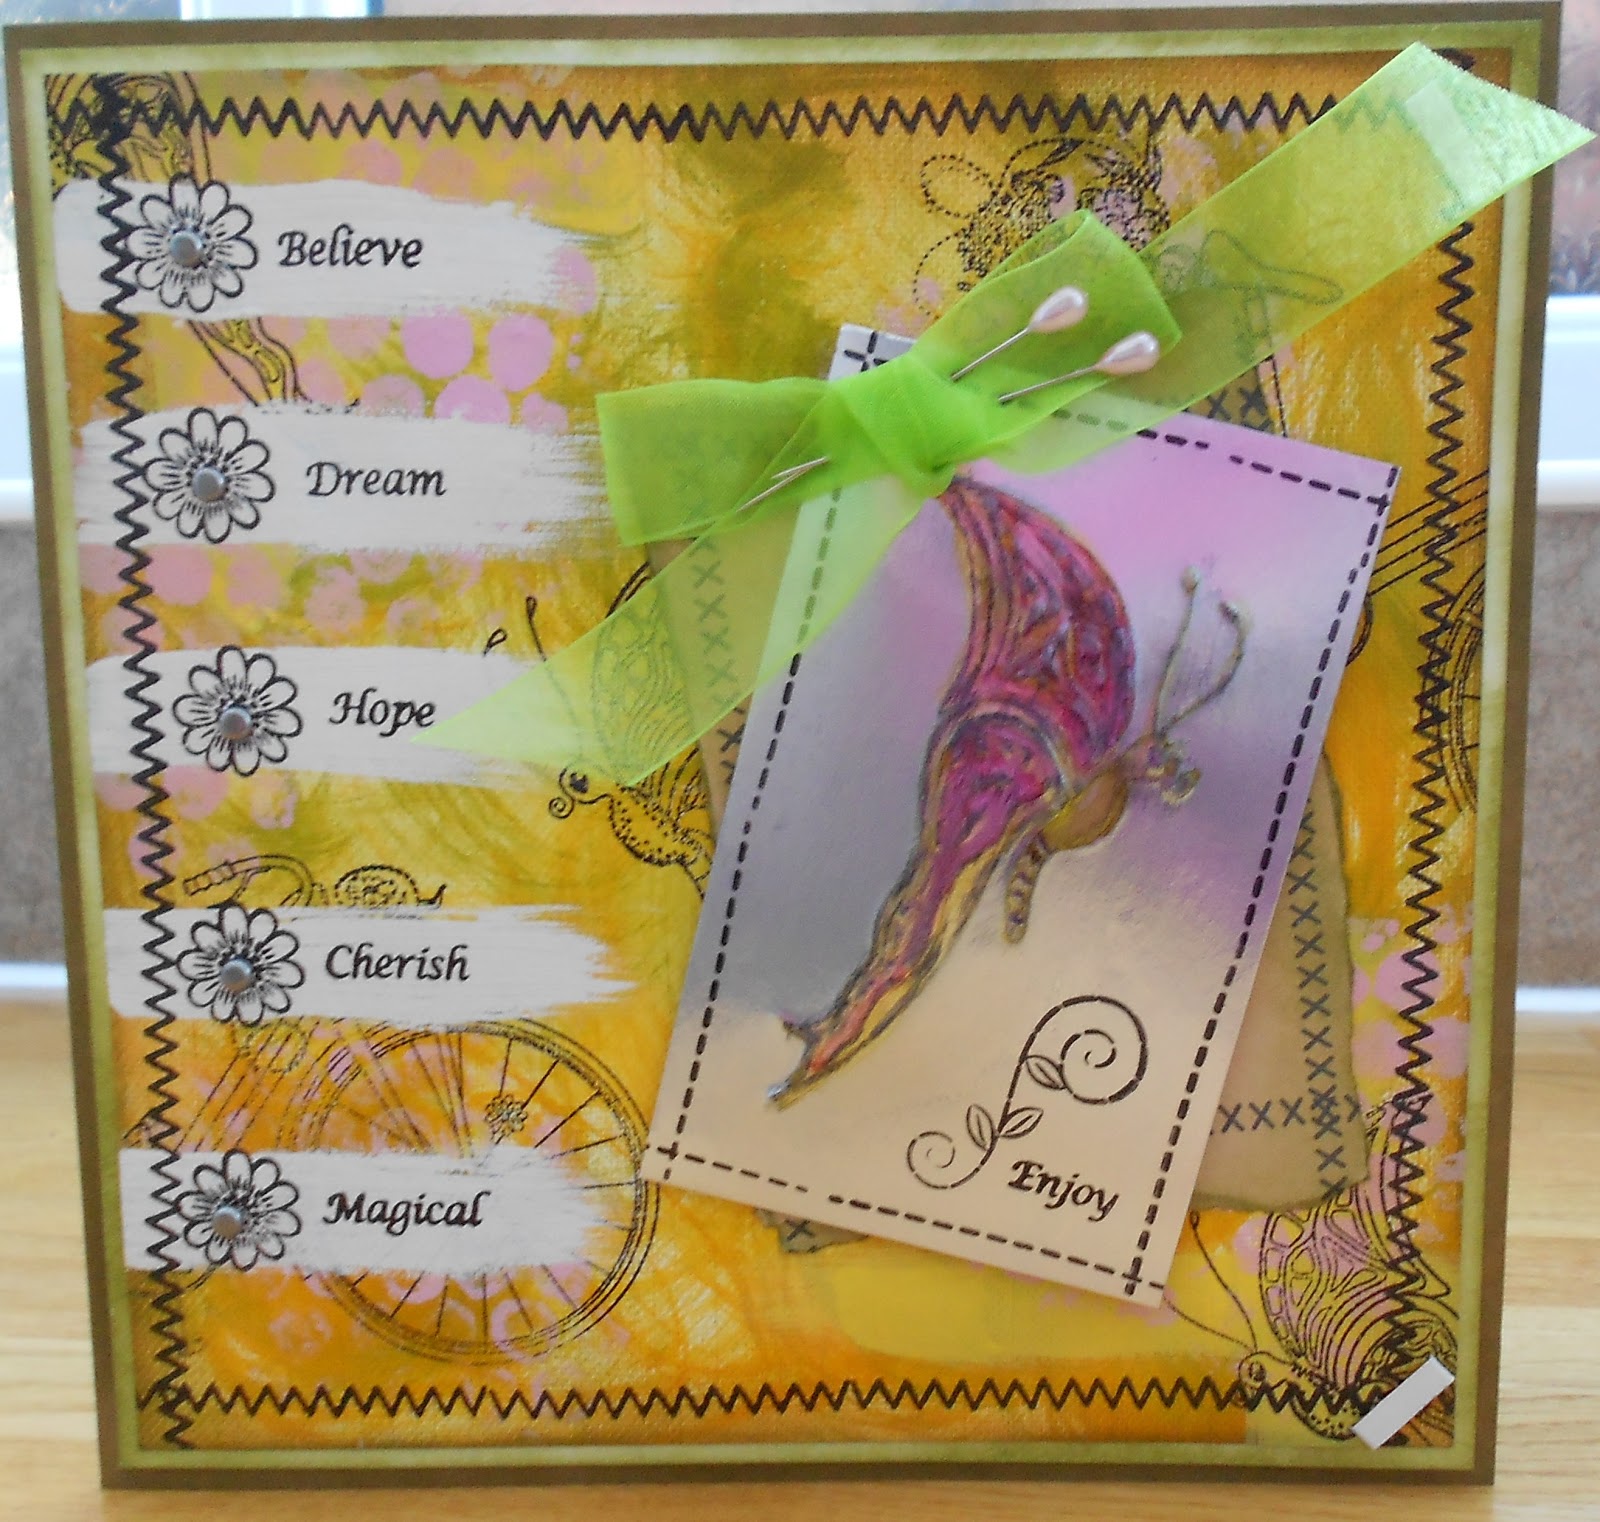
I started with the background on this card I used canvas paper and bright coloured alcohol inks (the inks do not work very well on canvas paper as they soak in straight away!). I covered the canvas paper with the alcohol inks then distressed around the edge. Next I played with acrylic paints adding them anywhere and everywhere! I also painted some bubble wrap and pressed that on!  I had great fun!

When the background was dry I stamped on the bike and butterfly. When the ink was dry I then did added some cream paint so I could stamp on the greetings. Next I stamped around the edge with the zig zag stitch (from Sew Creative). Onto the cream paint I stamped Believe, Dream, Hope, Cherish and Magical (from Grand Word Perfect 2) leaving enough space the stamp a flower between the stitching and the words.

The background was then attached to a cream piece of card that had been distressed. I then added brads to the centre of each flower and large Staples to the corners on the other side. This was then attached to an 8 x 8 inch card.

Next I stamped the butterfly onto the back of a small piece of mirricard. Then dry embossed it from the back. Once I was happy with how the embossing looked on the front of the mirricard I added alcohol inks to the butterfly. When the inks were dry I lightly rubbed the Stazon ink over the embossed image. Then I stamped Enjoy (from Grand Word Perfect 2) and the flourish (from Flower Powered) in the corner. And around the edge I stamped the straight stitch (from Sew Creative).

Next I tore a piece of pink paper then stamped the cross stitch (from Sew Creative) around the edge and distressed it. I then added the butterfly to the pink paper and added a ribbon and two hatpins. Finally this was attached to card.

I love how this card turned out and I had such good fun making it!

Thursday 13 December 2012

Dimension Stamps: Francais Couture

Here is another card made with the Francais Couture Stamps set (ref: 2400074a) from Dimension Stamps. 


For this card I also used the following stamp sets from Dimension Stamps:
  • Petal Passion (ref: 2400065a)
  • Sew Creative (ref: 2400073a)
To make this card I stamped the sofa from Francais Couture onto a square piece of white card. I then masked it off and then stamped the manikin (from Sew Creative) behind it. In the body of the manikin I stamped the "words" from Francais Couture. Along the top edge I stamped "Have a Glamorous Birthday" (from Francias Couture) then the round the remaining edges I stamped the straight stitch (from Sew Creative). Next I coloured and distressed it.
I then matted this onto purple card and around the edge stamped the straight stitch again. I then added a brad to the manikin.
Around the edge of an 8x8 inch card I stamped the words again and very lightly distressed it. I then attached the stamped image to this.
Next I stamped two of the large flowers onto purple card and a medium one onto plain white card and filled them with the words stamp, cut them out, distressed them and curved the petals. I attached these to the card using silicon glue. Behind the flower I added some purple flowers and hat pins.
Finally I added some pearl gems to the centre of the flower and to the remaining corners.

Monday 10 December 2012

Dimension Stamps: Francais Couture

Dimension Stamps have a new set of stamps out called Francais Couture (stamp ref: 2400074a). They will be showing it on Friday 14th December on Create and Craft at 11.00am, it should be a great show!


I got the idea for this card whilst watching Strictly, I just love the show and all those fabulous dresses! I think even Craig would have to give this dress a 10!
To make this card I stamped the bodice onto red card, cut it out, added Glossy Accents and left it to dry.
Next I cut a piece of white card, then tore a piece of scrap paper to mask of the centre of it. Around the edge I stamped the "words" stamp from the set. Once it was all covered I removed the mask and distressed it in red and black ink. I then cut a piece of black card to mount it onto and around the edge of that I embossed it using embossing enamel.

I mounted the white card onto the black and added some brads to three of the corners. In the fourth corner I added some black and red ribbon. To the ribbon I added some red feathers, a bottle top and some hat pins.
In the bottle top I had stamped "Dream" from the Grand Word Perfect 2 stamp set (stamp ref: 1803069a). Through the bottle top I attached a jump ring and hung a pair of earrings, it was just going to be an embellishment, but as I was attaching the beads they looked so nice I turned them into earrings, so you get a gift and a card in one!

I then attached the backing to a white card white I had distressed in red ink.
Once the bodice was dry I added black feathers to make the skirt and attached this to the card.

Thursday 6 December 2012

5 minute make....

I kid you not this lovely candle took a maximum of 5 minutes to make! Of course you can't light it but I very rarely light candles these days as my cat goes mad for the flames (yes he is a tad on the weird side!)


I decided to take a break from working on my tree skirt as it is progressing but very slowly. And I wanted to have a play with a new set of stamps that Dimension Stamps will be releasing on Create and Craft of the 14th!

So I stamped onto a white piece of tissue paper, then trimmed the tissue paper down so it just fit around the candle and had a very small boarder on the top and bottom. Next I wrapped the tissue paper around the candle where I wanted it and then wrapped the whole thing in greaseproof paper, then heated it slowly with the heat gun, turning it and moving the heat gun. Being careful not to melt the candle!

When the tissue paper had "sunk" into the candle, I then attached a black ribbon with a red one over the top. Where the two ribbons met I attached a fabric flower, inside it I put a bead cap and then stuck a pin through them all to secure it to the candle. (If you using a small candle be careful your pins don't pop out the other side!).

Next I added the feathers and secured with Silicon glue. Finally I stamped the "Enjoy" in Stazon onto a metal tag and attached that too!

See I told you it was a quick one!

Saturday 1 December 2012

Snug as a bug!

How cute is this cardigan!


I finally got around to sewing the buttons on this fella, I am really please with it, especially, as the wool (if you can call it that!) was an utter nightmare to knit but it traps heat and will keep you roastie toastie!

So as I had nearly a full ball left I decided to make a simple tea bag hat too!


Looks odd I know, but when you put it on it looks like ears! How cute!