Showing posts with label Dimension Stamps. Show all posts

Saturday, 14 December 2013

Nina Crafts: Owl Tree

When I saw the Owl stamps from Nina Crafts I knew I wanted to have one peeking out of a tree, and luckily on one of my many visits to craft fairs over the years I had bought some wood veneer pieces and I just had to use it.


The outside of the card is just so simple. I trimmed down  a piece of "wood" to fit the front of an 14.5cm card and cut out the "hole" using the Christmas wreath Movers and Shapers from Tim Holtz. I then distressed it.

Next I stamped the saying onto a scarp of card and trimmed it down, distressed it and attached it to the "wood" using brads. I then attached this to the front of a green card which had been distressed. I then lined up the wreath die again and cut through the card.

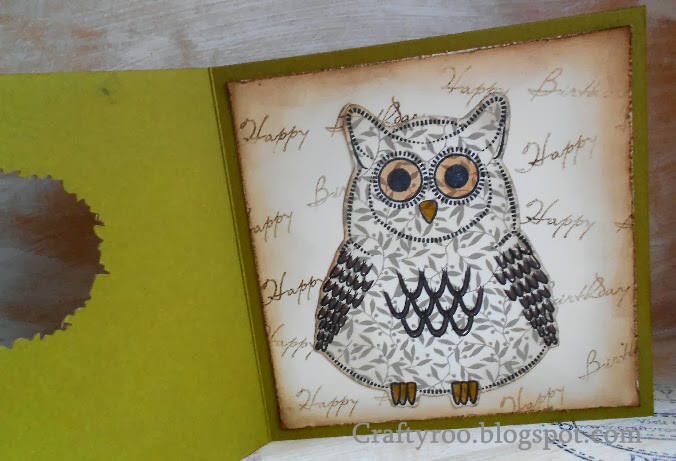
I then stamped the Feathery Owl onto some patterned paper, cut him out leaving a slight border, distressed him added some colour. Onto a a 13.5cm square piece of cream card I stamped "Happy Birthday" (from Birthdays galore) all over it and distressed around the edge.

To finished of the card I attached the 13.5cm square card into the base card and attached the owl making sure his eyes lined up with the hole.

Thursday, 12 December 2013

Nina Crafts: White Owl

For this card I just used the new Leafy Owl Stamp set from Nina Crafts (and the stitching from Sew Creative). I wanted this card to be just brown, cream and green but looking at it again I think the eyes needed to be black!


To make this card I stamped "Have a Hoot!" all over an A5 white base card and distressed it lightly in green. 

Next I stamped the Leafy Owl  onto pattern green paper and also onto Kraft Card. I cut out the green owl and coloured in his leafy bits. Out of the Kraft card owl  I cut out his wings, beak, feet and eyes and ears. I stuck these onto a small piece of cream and stamped stitches around the edge and distressed it slightly. This was then mounted onto Kraft Card and stitching added around the edge.

To finish of the card I added a piece of torn green patterned paper across the base card and added some lace and ribbon. The owl was then attached and Card Candi added to the eyes. 

Tuesday, 10 December 2013

Nina Crafts: Christmas Hoots

I have been busy making my Christmas cards and I just had to make some using the Feathery Owl, stamp set from Nina Crafts....


To make this card I started by cutting a 7 inch square white card and stamped the owl off center to the right. Next I masked him off and stamped the holly garland from the "All things Christmas" stamp set, once across each corner then filled in any gaps . I then stamped some straight lines to form a branch and "Season's Greetings" from Grand Word Perfect next to the owl. I then coloured it in.

Next I distressed lightly around the edge of the card, to the Poinsettia and Holly Berries I added Glossy Accents and some Stickles to the white Roses.  Once it was dry I mounted it on to some patterned backing card and attached a ribbon before mounting it onto an 8 inch square Kraft card.

Finally I added two metal corner embellishments and some card Candi for eyes!

Wednesday, 4 December 2013

Nina Crafts: Book Owl

I have had the new owl stamps from Nina Crafts for weeks, just sat on my crafty desk wanting to play but other things have jumped in front of them on the to do list (How rude! I hear you all cry!). 

BUT, I finally got to play and I have had soooooo much fun, so watch this space as there are many more ideas to come.......

This first card I just love he really is a wise old owl!!


To make this card I just used the Leafy Owl stamp set, but it would work with any of the three owls. 

I started by stamping the owl into a page of a book in black ink and just coloured in the leaves, branches, eyes, beak and feet. He was then cut out leaving a 1-2mm border and distressed lightly around the edge. I then stuck him onto some green patterned paper and cut him out again leaving a 1-2mm border and lightly distressed around the edge.

Next I cut a 5 inch square piece of kraft card and embossed down the right hand side of the card and distressed it. I then cut a page from a book to fit the 5 inch kraft card and tore down the right hand side and distressed it. I then stuck this to the kraft card.

In each corner I attached a bronze large brad and tied some string around the left hand side. This was then attached to a 14.5 cm square green base card.

To finish of the card I attached the Leafy Owl and stamped "Have a Hoot!" onto a scrap of cream card, trimmed it down, distressed around the edge and mounted it onto green card and attached it to the card.

Stay tuned I have been playing (sorry) making lots...........

Friday, 25 October 2013

Nina Crafts: A Cracker of a Christmas

Here is another card made using the new stamps from Nina Crafts this stamp set is called Cracking Christmas and All Things Christmas. Isn't Cecil a little cracker! (I couldn't resist lol!)


To make this card I stamped Cecil onto a piece white card and stamp the dots from All Things Christmas around the edge. he was then coloured in and distressed. Cecil was then mounted onto some green card.

I then stamped the sentiment onto a small piece of white card and the dots around the edge again and coloured them in to match Cecil.

Next I attached the sentiment to Cecil by punching four small holes (two on each hands) to make it look like Cecil is holding the ribbon. I then punched two holes along the top of the sentiment and threaded some ribbon through. I love how this worked as the sentiment moves!

Onto the bottom of a DL card I attached some patterned paper and attached Cecil centrally to it.

To finish off the card I added Glossy Accents to Cecils glasses and Stickles to every other dot around the edge of Cecil and the sentiment.

Saturday, 12 October 2013

Nina Crafts: Granny kisses are coming to town!!!!!!

I love this card I had such fun making it and every time I look at it it makes me smile! What more can you ask from a card?

For this card I used the new stamp set from Nina Crafts Love and Marriage under the Mistletoe.


To make this card I stamped and coloured in Love and Marriage under the Mistletoe.

Next I cut two 14cm square cards one in red and the other in green and stuck them together to create a tri-fold card. Onto all the sides (except the back centre one) I added some pattern paper and some co-ordinating washi tape.

Then I created the text and mounted these onto card leaving a slight border and one of them to each side (except the centre panel).

Onto inside centre panel I attached the stamped image which had been matted and layered a few times. And to finished it off I added card candi, Glossy Accents and Stickles!!!!!!

Monday, 7 October 2013

Nina Crafts: Balloons away!!!

When I saw the new stamp set from Nina Crafts called Baubles Galore I immediately got the idea for this card, and I just couldn't shake it until I had made it!


To make this card I stamped the two round baubles onto a small piece of white card and masked them off. next I created the background by Using distress Inks and a water brush.

When I was happy with the background I removed all the masked and coloured them in using Distress Inks again. Once it had dried I then stamped "Thinking of You" from the Occasions stamp set. I than mounted this onto some dark brown card and tied some string around it.

Next onto a 6 by 6 inch square Kraft card, across the bottom of the card I added some pattern paper. Onto this I then attached the balloons.

Thursday, 3 October 2013

Nina Crafts: Have a drink on me....

This money wallet is a template I have had for years, so when I saw the new Mullered Mavis' Christmas Party stamp set from Nina Crafts I just had to dig it out of the cupboard!!!! 


To make this money wallet, I started by cutting it out from some patterned thick paper, then measured the front and cut a piece of white card to fit. Onto it stamped Mavis. I then masked her off and stamped the stars from All Things Christmas Stamp set down the two edges. Across the top I stamp "Have a drink" and across the bottom I stamped "on ME!!!" Using ABC 123 stamp set. I then coloured it in and distressed around the edge.

Next I stamped Mavis again onto the inside of the top flap, masked her off and stamped a border of stars around the edge. This was then coloured in too.

Around all the cut edges I added Washi Tape to tidy up the cut edges and fixed the wallet together.

Onto a small scrap of white card I stamped a bow (also from All Things Christmas) and used it as a fastener for the wallet.

Finally I attached Mavis to the front of the wallet and added Glossy Accents to the baubles and glasses, and Stickles to the tinsel!

Tuesday, 1 October 2013

Nina Crafts: Mistletoe Kisses

Last week I got to play with the new stamps from Nina Crafts the stamp I used for this one is called Love and Marriage Under the Mistletoe.


To make this card I stamped Mr & Mrs onto white card and then trimmed it down to the smallest square possible. I then coloured in the image (I am not great at colouring in, so just don't look too closely!)  and distressed around the edges.

Next I raided my Christmas papers until I found the background, tied some bakers twine around the base of the stamped image and attached it to the background paper using some over sized brads.

I then attached that to a Kraft card.

I was really pleased with how it turned out and, it was really quick to make! 

Tuesday, 17 September 2013

Birthday number 3...

This time it's my mums birthday!

I was so pleased with how this card turned out, I raided my stamp stash and found a set of Kaisercraft stamps I had never used (how rude!) so I HAD to used them for this card.

I love how it turned out it was the perfect card for my mum!


For this card I started by cutting a 7 inch square white piece of card and all over I stamped using a script stamp in Old Paper Distress Ink, then stamped the birdcage in the top corner and  a smaller arrangement from the same set in the bottom left (not that you can see it!) Finally I randomly stamped a flying Hummingbird.  When I was finished I distressed around the edge. To get the line effects I used the edge of my stamp pad ran it through my ink and tapped it onto the paper (some people use string around a block to get the same effect!).

Next I die cut the Tim Holtz Bell jar and pedestal. Onto the top I stamped the Poppy (mums favourite flower!) from Forever Floral (Dimension Stamps), coloured it and distressed it. The pedestal I just distressed.

I then cut a green piece of card 7 & 1/2 inch square and stamped the script around the edge again and distressed it. Next I attached the birdcages to it. Around the bottom I added some lace (Which I had distressed as white was too bright!) and some brown ribbon. In each corner I attached a brad and a bead cap. This was then attached to an 8 inch square card that had been distressed and the bar from my Mini cog corners stamp set stamped in each corner to make a frame.

To finish off the card I added the die cuts and some hat pins. Then added Glossy Accents to the poppies.

And here's a look at the inside......

(I always forget to take a picture of the insides!)

Wednesday, 7 August 2013

12 Tags: May

I know it isn't May anymore but I have finally got around to having ago at making the Tim Holtz tag for May. 

I just love the techniques he used on this tag. The base tag is made by adding rub-ons then using inks or stains over the top, the effect you get is just fabulous - I will be definitely be using this technique again.


The stamp set I used to make this tag was the Vintage "Pretty Antiquity" stamp set from Dimension Stamps.

Sunday, 4 August 2013

Nina Crafts: Flutterby

This card has also been made using the new stamp from Nina Crafts Butterfly Flourish. I also used Window of waves and Posie Passion.

I have approximately and million and one, okay maybe not that many but ALOT! of aperture cards just sat in my craft room gathering dust so I decided they need to be used and I just love how it worked for this card! 


To make this card I started by cutting a piece of white card slightly smaller than my aperture card and stamped the butterfly into the center. I stamped the butterfly again onto vellum, then stamped two of each of the flowers from Posie Passion and over stamped them all with Window of Waves and left them all on one side to dry!

I then coloured in the butterfly flourish that had been stamped onto white card and distressed around it. This was then positioned in the aperture and trimmed down to fit. 

In two opposite corners around the aperture I stamped the swirl from Window of Waves, to do this I stamped it once and created a mask (leaving a 2mm border when I cut it out) and stamped it again. I then coloured in the dots and distressed around the edges.

Next I cut out the flowers and the butterfly and coloured in the butterfly on the reverse using the same colours that were used on the white card.

To finish the card I attached the butterfly flourish to the inside of the card and added the flower before sticking down the back of the aperture card. Then I added a big ribbon and some hat pins. 

Saturday, 3 August 2013

Nina Crafts: Butterfly Engagement

So I have said it many times before but here goes...... 

The idea for this card (in my head) was simple nothing over the top, well.......


I tried! And it looks nothing like the idea I started with!

For this card I used the new Flutterby Flourish, Occasions and Popular Phrases stamp sets from Nina Crafts.

To make this card I started by stamping the butterfly twice onto white card and cutting them out I then cut a piece of white card 2cm smaller than an A5 card and positioned the butterfly in the top left corner (but didn't stick it down). I then placed the word stamps onto the card making sure they were clean first! And lay a large acrylic block over them to make sure they stayed in position and fiddled until I was happy with how they would stamp out. These were then stamped and embossed in copper embossing powder.

Next around the edges of the card I stamped the flourish part of the butterfly stamp and coloured it in lightly. When it was dry I quickly brushed the edges with a copper Distress Stain. This was then matted onto copper pearl card and I added a brad to each corner. This was then matted onto a cream pearl A5 card.

To finish off the card I coloured in one butterfly using distress stain and added it to the card along with the other butterfly that I then added Stickles to the wing sections and body.

Friday, 2 August 2013

Nina Crafts: Tufty Tag

I love how this card turned out, when I realised that the Tufty wishes stamp from Nina Crafts fitted onto the Manila tags, I keep as a must have in my crafty stash I went to town on this card.


For this card I used Tufty Wishes, Mavis goes swimming, Party Tufty, Picket Fence and of course a delicious manila tag.

To make it I started by stamping Tufty onto the centre of the tag then I masked her off and stamped the ladybird and masked that off too. Finally I stamped the Picket fence and removed all the masks. Next I coloured in the tag using Distress Inks. Then when it was dry I distressed around the edge.

Onto a piece of white card slightly smaller than DL I stamped the stars from Mavis goes swimming all over the top part of the card and the saying from Party Tufty all over the bottom in pink and distressed around the edges. Across the centre I added a thick purple ribbon and a thinner white one. This was then mounted onto a DL Kraft Card.

To finished of the card I added some ribbon to the tag and attached it to the card at an angle. In the top right corner I added a corner embellishment and in the bottom left I added some feathers, flowers, brads, you name it I added it lol!

Thursday, 1 August 2013

Nina Craft: Come and Play?

This card was inspired by a close friend of mine who happened to mention she was having trouble getting hold of one of the mums at her daughters school ,as they always seemed to miss each other. And her daughter is constantly asking for this friend to come and play. Well always up for a challenge and not wanting my friends little girl to miss out on some fun I set to work......


I made a lot of these little fellas, all gender neutral of course!!!!!!

For this card I used the new stamp sets from Nina Crafts Tufties in Love, Tufty Wishes and ABC 123.

To make them I started by stamping Tufties in Love onto the smallest piece of white card possible, coloured them in and rounded the corners. This was then mounted onto patterned paper and then again onto white card.

Next I stamped "Sing... Dance... Play..." diagonally across the top half of a 6 by 6 inch square card. Over the bottom of the card I added some patterned paper and finished it off with some ribbon (to hide the edges!).

I then cut a die cut shape, out of white card and the next size up one from patterned paper. Onto the white card I stamped "Come and play?". I put the die back around the die cut shape and "coloured it"  using Distress Inks and then mounted it onto the patterned paper.

To finish the card I stuck the Tufties to the bottom left of the card and the sentiment just above. The bottom right corners was looking a little plain so I  added quick doodle as I couldn't find the perfect brad!

They are (as my little lady would say) "Super Fast" to make and my friend loved the batch I gave her so much so she has asked for a batch to give to a friend of hers lol!

Wednesday, 31 July 2013

Nina Crafts: All about Love.....

This card was really quick to make, Yah! BUT it turned into a disaster D'oh!

For this card I used the new stamp set from Nina Crafts Tufties in Love and Popular Phrases.


To make this card I stamped the Tufties  onto the bottom right of a pre-cut scalloped square card, then next to that I stamped "On Your Special Day" and in the top left corner I stamped the border. Next I coloured them all in using Distress Inks and a water pen.

Next I raided my 12 by 12 inch papers and found this wonderful double sided LOVE paper so I cut it in half length ways then scored it at 3 and 9 inches to make a gate fold card. I then found some red card and cut a matt to fit the stamped image.

Then using off cuts I cut a narrow strip of red card and a wider strip of off white, matted them and added some ribbon and a buckle. I stuck this in the centre of the card.

To finish this card off I attached the Tufties and added a gem to three corners and a BIG bow in the top left hand corner and some hat pins.

For the inside I stamped the border at the top and bottom of another precut scalloped card and coloured them in I them added Glossy Accents to the hearts to finish it off.

So where is the picture of the inside??? I can hear you all shout! Well I closed the card before the glossy accents was dry, yep it was a mess! Ggggggrrrrrrrrrr!

Tuesday, 30 July 2013

Nina Crafts: Party Tufty

Whoops it's been a crazy couple of days, we headed out to Tatton Flower show on Friday and nearly melted as it was soooooo hot, but we still had a fab day, then Sunday was Little Ladies "Birthday" so a crazy day, yesterday we vegged out even Little Lady refused to do much and then today (Little Lady's actual Birthday!) we are enjoying playing with all our new toys and I have sneaked away for a few moments peace and back to all things crafty......

This card was made using the new Party Tufty stamp set from Nina Crafts. I really do love how this card turned out as I am not very good at colouring in!!!!!! I also used the picket fence stamp.


To make this card I started by stamping Party Tufty onto a square piece of white card and masked him off, behind him I stamped the picket fence ( I masked off the grass line so that the fence looks like it is sat in longish grass) and unmasked Tufty. Around the edge of the piece of card I tore some sticky notes and masked an edge. Next I coloured in Tufty using Distress Inks and a water pen. When I was happy with how it looked I then unmasked it and doodled a border around it in a black pen.

Next I cut a larger square piece of white card (as I couldn't find a pink piece I liked!) and stamped the cupcake around it in pink, then distressed it in other shades of pink. I then matted Tufty onto this piece.

Onto another square piece of white card I stamped the saying all over it in pink and I stamped the cupcake in three corners and distressed it.

Next I die cut and embossed two die shapes one just big enough to have the saying stamped onto it and the next size up out of white card. Onto the smaller one I stamped the saying then put the die back onto the shape and distressed it. Onto the larger one I put the die back onto it and stamped the cupcake all over it and distressed it too. I then removed the dies and made sure I gave them a quick wipe! 

Then onto an 8 by 8 inch square Kraft card I stamped the small balloon all over and doodled a boarder in black pen. In the top right hand corner I added the sentiment stamped square piece of card. Onto the Tufty square of card I added three brads and attached it to the bottom left corner. Finally I added the die cut sentiments.

Thursday, 25 July 2013

Nina Crafts: Tutfy Wishes

I think I am going to make a batch of these cards for all of little ladies girly friends, I love how she can dance (well rock!) so gracefully!

To make this card I used the new Tufty Wishes, Popular Phrases and Birthday Galore stamp sets from Nina Crafts.


To make this card I found a die that would fit Tufty onto and stamped her in brown then masked her off. I the left the die around the die cut piece so I would be left with a white edge after distressing it. Next I stamped "Happy Birthday" all over the die cut in pink then distressed it. Once I was happy I removed the mask and the die and coloured in Tufty. I used distress inks to do this.

Next onto a rocker card I stamped "To Someone Special" around the bottom twice then distressed it too.

Then I distressed a large doily and cut it to fit the rocker card so that the text would still show.

To finish the card I stuck the doily and topper to the card and finished it off with a big bow and a couple of hat pins. I also added some Glossy Accents to the crown.

To make the pins safe for little fingers I snip off the sharp ends and add a small bead.

Wednesday, 24 July 2013

Nina Crafts: Birth Announcements

When I first saw the new Party Tufty stamp set from Nina Crafts I immediately had the idea of making them into Birth Announcements, as a lot of the work can be pre-done in those last few (very long weeks!) or maybe at a baby shower!

This one I added blue for a little boy but it could easily be done in pink or purple for a little girl. I also used the Occasions, Tufty Wishes, ABC 123 and Sew Creative stamp sets.


This card is really easy to do! 

All I did was stamp Party Tufty onto a 6 by 6 inch square white card then stamped the grass and ladybird and the butterfly from Tufty Wishes. Then around the edge of the card I stamped the stitches from Sew Creative and the "xxx" from Party Tufty.  I then coloured in the bunny in yellows and pale browns. This could all be done in advance.

Then when the baby is born you colour in the remaining parts on Tufty, the ladybird and butterfly. Onto a corner of white card stamp the baby's name then mount that onto some blue card and attach to the card. 

Finally I added the ribbon and a button.

Now what a perfect gift to give a crafty mum to be 20 stamped cards, some pink/blue ribbon, some card for the name and the ABC 123 stamp set.

Tuesday, 23 July 2013

Nina Crafts: 21 again????

For this card I used all the lovely ladies from the new Nina Crafts stamps! 

I also used Birthday galore, Plain Alphabet, Plain numbers matching and letter frames. 


To make this card I started by stamping three stars onto white card then in each star I stamped a different Mavis, then onto scrap card I stamped each of the glasses again. These were then coloured in and cut them out.

Next I stamped out "21" and "AGAIN" and filled them in using the stars and circles from Mavis goes swimming. These too were coloured in and cut out.

Then onto a strip of pale purple card (slightly wider then the stars) then stamped Happy Birthday in silver Glitter Paste and mounted it onto Silver card and added four purple brads. Then into the corners of a dark purple A5 card I stamped the stars in silver Glitter Paste too.

To finish of the card I stuck the pale purple strip of card across the center of the card and added the three Mavis stars and their additional glasses. I then stuck the "21" above the lovely ladies and "AGAIN" below. Finally I added Glossy Accents to the ladies glasses and the numbers/letters.