Showing posts with label Poly Plates. Show all posts

Wednesday, 2 January 2019

Mojo - Picture Adventure.....

"So, the adventure begins....."

and what and adventure 2019 will be! 

I'm not planning on scaling any mountains or setting sail around the world, but each and every one of us will be embarking on a new adventure this year, whether it be reading a new book or starting a new craft project, every time we open ourselves up to the possibility of the new, our adventure awaits! And that is really why I chose this saying for January, we are trying a new things this year and our adventure is just beginning...

So, should we get cracking on this new adventure?

I think so to! Today we are going to create our very own inspirational picture


First up you will need a picture frame mine was a cheap one that was left from a multi-pack. I took the back off it and just the paper inside as a template to cut my piece of card.


I then made sure my stamps/POLY PLATE were clean and dry and lay them out on the reverse of the paper form the front of the frame.


Next I used our 10cm Circle POLY PLATE and sprinkled Brusho over it (Gamboge, Turquoise and Purple) and added a little SprinkleIT (Copper) too.

I spritzed it a little then cleaned up my STAMP BASE so I won't get as many drips.


I stamped this in place on the sized piece of card. I then stamped one of the trees from the Twin Pines stamp set using Brusho (Emerald Green and Leaf Green).


To stop the trees from floating I sprinkled a little bit of Brusho powder onto my matt and spritzed it  until it was very watery. I then painted in the ground. I then did the same in the sky using the Turquoise Brusho. And then left it to dry.


Once it was dry I stamped the Adventure saying in Black Archival Ink and placed it in the frame.


 Where will our next adventure take us????? 

Monday, 6 August 2018

Monthly Make Monday - Off the page again......

Well, it's Monday so that can mean only one thing there is another creation to share using our fabulous Monthly Make Stamp set!

I had one last Christmas Idea to share with you, again I decided to stamp off the page, but I hope you agree it turned out fab, I just love this colour combination.


First up I trimmed my piece of card down so it was 1 cm smaller than A5. I gave my POLY PLATE a quick wipe with a baby wipe and inked it up using stormy sky, broken china and faded jeans, gave it a quick spritz and stamped one at either side of my piece of card, making sure to re ink between images.


For the centre tree I used darker shades of blue so broken china, faded jeans and chipped sapphire, I stamped the tree in the centre and higher up the page this time.


Next I coloured some silver sparkle pen onto my glass mat and used it to "ink" up the snow stamp and then stamped it across the top of the card. When it was dry I stamped the sentiment in clear ink and embossed using Vintage Black embossing powder.


To finish the card off I mounted it onto a piece of black card, tied a piece of pale blue ribbon around the base of the card then mounted it all onto an A5 white base card.


I hope you agree another really quick and simple card made using the Fabulous Tree POLY PLATE.

Monday, 23 July 2018

Monthly Make Monday - Stamping Off!!!

No I'm not in a paddy!

But, it does feel a bit strange to be sat here talking about Christmas after spending a fabulous day on the beach with the Roolets! We have whisked our little people off to the VERY sunny East coast for some family time and it's positively tropical on this side of those hills!

So I have sneaked away for a moment or two to share with you a really easy card I made using this Months Monthly Make Stamp set.


First up I inked up the  POLY PLATE up using bundled sage, cracked pistachio and peeled paint, spritzed and stamped half the tree on the left hand side.


Then inked it up again using cracked pistachio and peeled paint, spritzed then stamped it about half an inch further off the page.


And one final time I inked up, this time just using peeled paint, spritzed and stamped it again even further off the page. I then gave it a quick blast with the heat gun to dry the ink.

I then inked up just the Christmas part of the large sentiment at the base of a trimmed down A5 piece of white card, I stamped in clear ink, then added Ravens Night Embossing Powder and heat set it.


Across the top of the card I stamped the snow again in clear ink but this time used our Vintage White embossing powder and heat set it. Once it was cool I distressed around the edge of the card using fossilized amber and peeled paint Distress ink.


My tree needed some decoration so I grabbed my Sparkle pens and added some tinsel I was going to add a few baubles too but my Stickles were missing I wonder who "borrowed" then LITTLE LADY!

Once the sparkle pens were dry I mounted my image onto a piece of burgundy card and attached a ribbon around the card. This was then mounted onto an A5 base card. And finally I tied a bow on my ribbon.


Another really quick and simple using this months Monthly Make set.

Now, I must dash there is a spot on the beach and it's calling me!!!!!

Tuesday, 13 March 2018

Easter Day 2

Okay, Okay, I know I am kinda cheating with this one! Those lovely Monthly Make members amongst you will recognise this little beauty from February, but it is so nice I wanted to share it again.


So here goes......

First up cut a piece of white card 1cm smaller than a DL base card.

Using the Distress Panel POLY PLATE from February's Monthly Make, give it a quick wipe with a baby wipe then start to load up the colour.

Cover the entire POLY PLATE with fossilised amber, then the top 2/3 with carved pumpkin and the top 1/3 with fired brick. Spritz with water until the ink turns fluid. Stamp this onto the piece of white card. Leave it to dry.

When the Sunset is dry stamp the Spring Flower Silhouettes #1 & 2 across the sunset in brushed corduroy. (After many requests the Spring Flower Silhouettes are also available in Minis and Large!) 

On a scrap piece of white card Stamp your saying with clear in and emboss using Vintage Black embossing powder and heat to set.

Mat the sunset and the sentiment onto a slightly bigger piece of black card. Then around the Sunset piece attach a piece of yellow/gold ribbon.

Attach the sunset to the front of a DL base card and stick the sentiment over the ribbon.

So how about another Easter offer? Well I can't discount our Monthly Make Stamps sets any more as we don't have many of February's left and if I was to add any more stamps to Mr Roo's making list he might just say a few naughty words!!!!

So instead how about another Poly Plate offer???????

Sunday, 11 March 2018

Easter

I know its Mother's day today and we are celebrating those very important ladies in our lives (and rightly so too!) but, I thought I would sneak away and have some me time! 

Easter is a big deal here at Crafty Roo HQ, my two little people love the magic and excitement of the Easter hunt - I can't call it an Easter EGG hunt as they don't really eat Easter Eggs I generally end up tucking into them between Summer and Christmas. So our Easter hunt has clues on how to find the prizes and all sorts of silly things to find and lots of giggles and laughter.

This year I thought I would get my act together, as I am always making cards and gifts last minute and come up with some quick and easy card (and gift ideas) for Easter and share them hopefully every other day between today and Easter!

So today's card is really quick and simple to make and more importantly your can colour it however you like.....


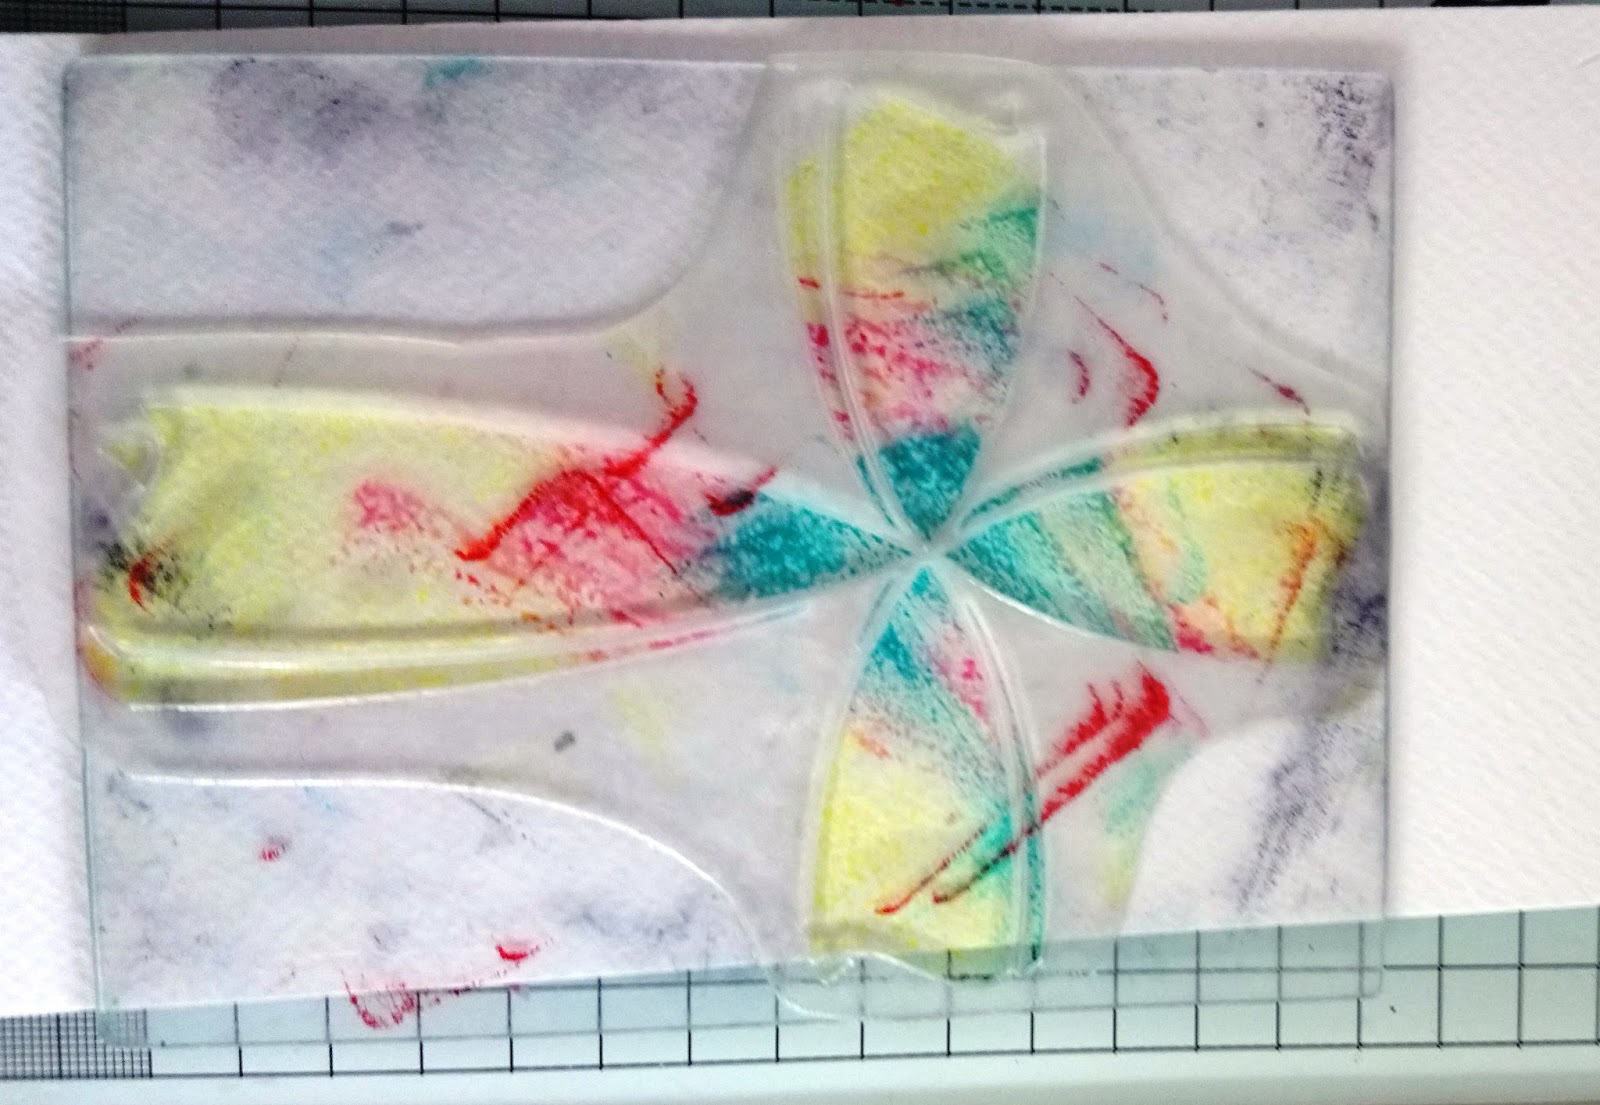
First up I cut a piece of our STUCCO card to measure 7.5 inch square.

I then wiped over the Curved Cross POLY PLATE with a baby wipe and inked up the whole thing with squeezed lemonade, then the centre with picked raspberry.


And then in the very centre with peacock feathers.


Spritzed it and placed the cross onto the STUCCO Card over the the left hand side.

I lifted the POLY PLATE and allowed it to dry. 


Yes you can use ordinary card to do this, but, the STUCCO with keep the colours brighter and will not bleed or muddy as much as normal card.

When the Cross was dry I stamp He has Risen! sentiment using Sepia Archival Ink.


The STUCCO was mounted onto brown card and then onto and 8 inch square base card.

I added a bow made out of string to the centre of the cross.


I did say this was a quick card! But a fab one for mass producing or just having fun with the little ones. So how about an offer on the stamps I have used? Of course How about the POLY PLATE and He has Risen for £9.50 and don't tell Mr Roo but I will also throw in some STUCCO Card too!!!

For this offer check out our website

Wednesday, 29 March 2017

March's Monthly Makes - Sue's Designs....

Back again, I hope you didn't all fall off your chairs with surprise! I know 2 posts in 2 days unheard off, but here you go...

Sue went to town with her makes for March so I thought I would pop a few on here.....


For this one Sue used the Poly Plate to create the background, then stamped over the top when it was dry.


Sue has again created a lovely background using the Poly Plate and then used it to create the reversed image of the flower - Fab Hey!!!!


No Poly Plate this time just a stunning card for any occasion!


This is a similar card to the purple one above, just expanding on the idea!  


For this one Sue has used the Petals from the Flower and teamed it with Mildred.


Sue has used one of my favourite techniques for this one Bleaching, what a fab effect.


This beautiful card has a lot of cutting out but wow is it worth it.


Lovely aren't they I love the cream and brown one above, the colours are fab!!!!

If you would like more information about this months fabulous Monthly Make then please visit our website www.craftyroodesigns.co.uk 

Tuesday, 28 March 2017

March''s Monthly Make - Poly Plates

Wow where has this weather come from??? 

It is fabulous, we had a "free" weekend and most of our time was spent outside playing or more accurately digging in the mud finding wormies. Little Man is currently trying to convince Granny that it's ok to dig the plants up when your on the quest for wormies, She's not looking so convinced, so I have hidden myself away for a few minutes to share with you March's Monthly Make!!!!

We are so excited to about this month's make as it is a Project Month so that means something new and boy this month you are in for a treat! In May we will be launching our Poly Plates but as March was project month it would  have been rude not to try them out.....


So this month you get an A6 Poly Plate, an "Amazing" stamp set and all the instructions to get you creating amazing backgrounds with your Poly Plate....


We also show you how to reverse stamp...


And at in the end we make two fabulous cards


Oh and I nearly forgot, we have included our fabulous STUCCO Card in the kit too this stuff is amazing it eats up any medium you can throw at it and keeps the colour intensity too!!!!!

IF you would like more information about this months fabulous Monthly Make then please visit our website www.craftyroodesigns.co.uk 

 Oh and if you are wondering about the card watch this space I have loads of beautiful card/paper coming your way!!!!