Wednesday, 10 June 2015

1st Fathers Day

Here is another card made using our Tall Dad sentiment stamp, this one makes a fabulous 1st Fathers day card or a card for a new dad!


To make this card I stamped the Tall Dad sentiment onto some white card and trimmed it down. I then doodled around the edge of the image and crossed out the "you" and wrote I.

I then found some backing paper and mounted this onto a matching backing card and then onto an 8 x 8 inch base card. I also cut a strip from the two matching cards and stuck those across the card about 1.5 inches up from the bottom of the card.

Next I mounted the sentiment onto the matching coloured cards and trimmed them down leaving a small border on each. This was then attached to the card using foam pads.

To finish of the card I added a Sizzix die cut animal (with a googley eye of course!), some buttons and string, then finally added some glitter glue to highlight "DAD".

If you like our stamps, why not check out our website.

Tuesday, 9 June 2015

Father's Day

So with Father's day just around the corner I thought I would share a couple of ideas!

This first card is so quick and easy to do but I think it looks great too!


To make this card was cut a piece of off white card 2cm smaller than A5. I tore a piece of scrap paper to create a landscape and using distress inks, inked the bottom green. And on the top I tried to create a sun set. I doodled around the edge and then mounted it onto green card and attached some string and then attached it to a brown base card.

Next I stamped the Tall Dad and one of the trees from the Lots of Trees stamp set and trimmed it down so it was 2cm bigger than the stamped image. I then lay this on top of the background piece and matched up the hills. I removed the background and inked up the hills. doodled around the edge and mounted onto a piece of green card. This was then attached to the front of the card using foam pads.

I think this one would make a lovely scrapbook page or canvas too!

Wednesday, 3 June 2015

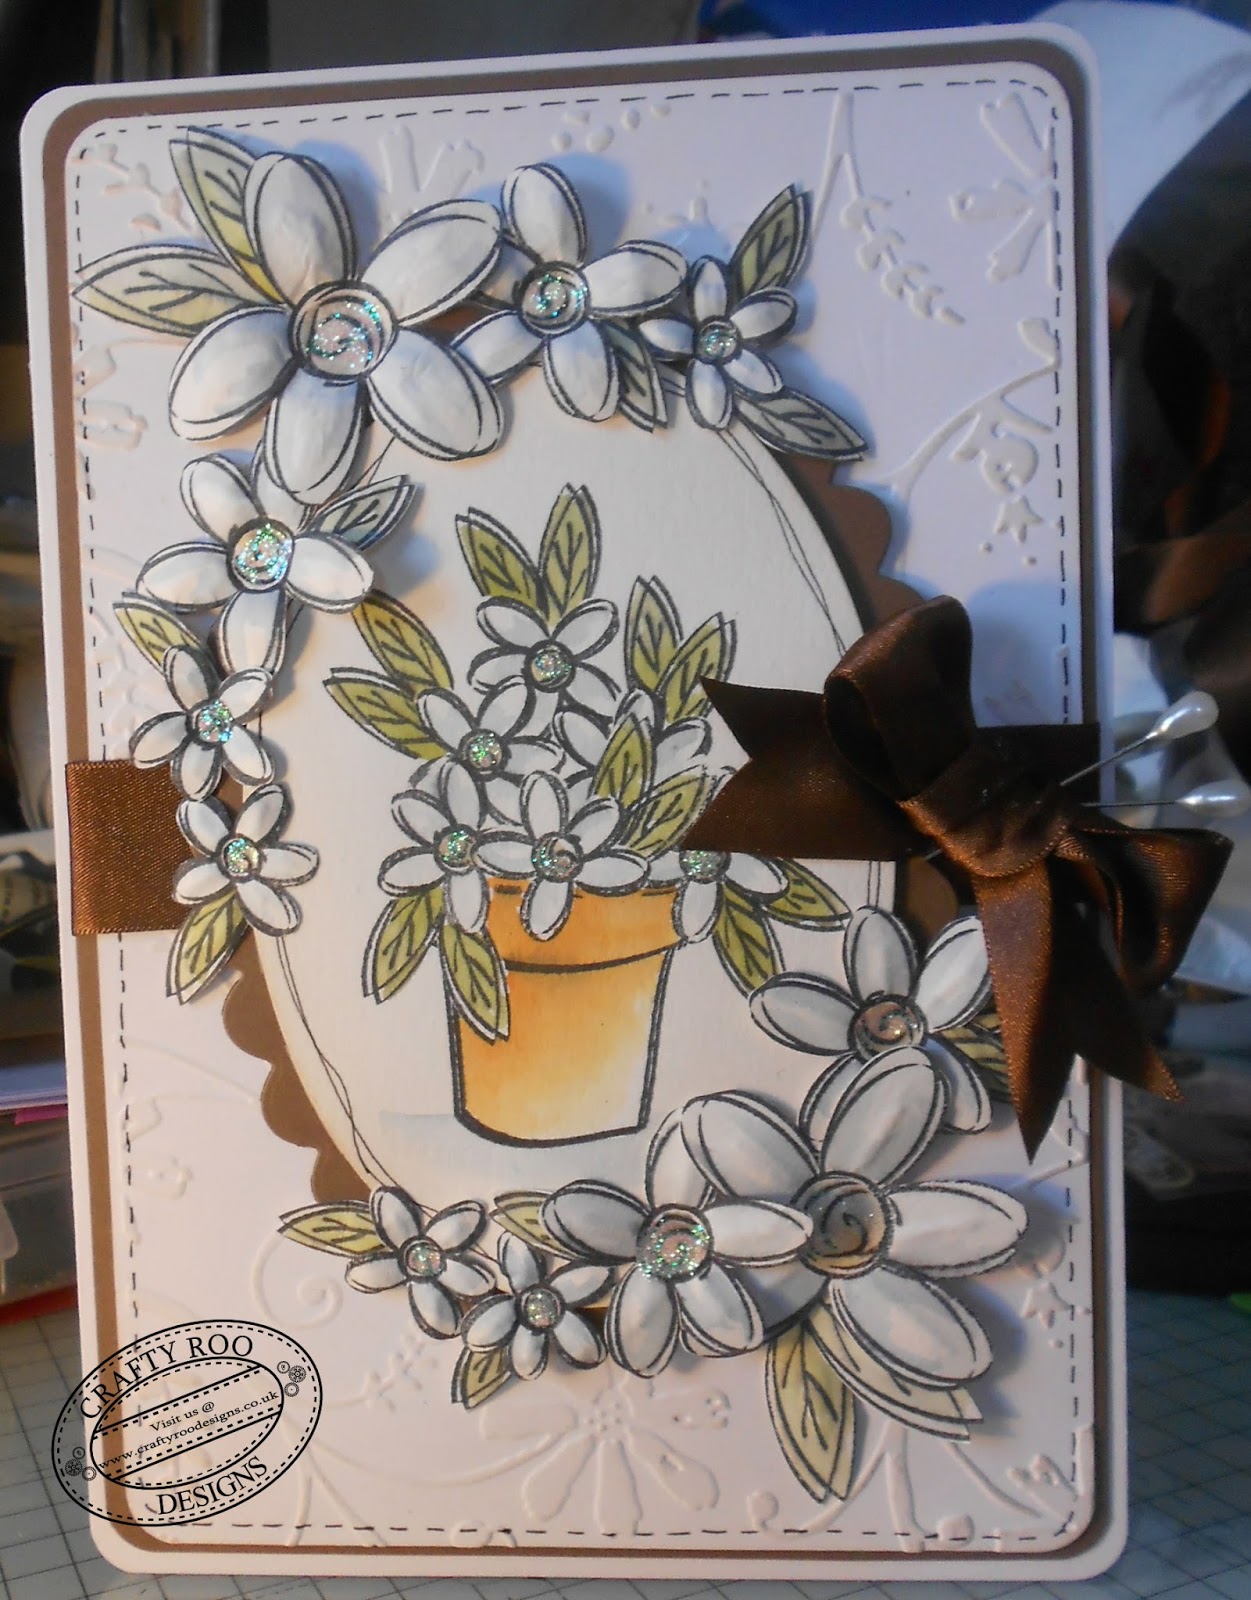
A pot full of daisies

I love flowers but this year my garden is more veggies and fruit than flowers, as I just haven't gotten around to sorting out the bedding plants yet. Little man doesn't seem that keen on gardening as he spends most of the time pulling up any plants I have just planted! So this year veggies will have to do and hopefully next year he will understand not all plants want pulling out the ground and eating!

I just love how this card turned out and, I really enjoyed making it - stamping, painting and distress inks what could be more relaxing??????


To make this card I started by die cutting a large oval out of cream card and stamped the small daisy in the centre and masked it off and repeated until I had a triangle of daisies and then I stamped the largest pot from the Lots of Pots stamp set. I then coloured them in using Distress Inks and a water brush. I then distressed around the edge and added two doodle lines.

Onto another piece of cream card I stamped 2 of the largest, 4 of the middle sized and 5 of the smallest Daisy flowers. And then 4 of the larger leaf and 10 of the smallest ones. These to were coloured in using Distress Inks, cut out and shaped using an embossing tool.

I used an A5 off white card for the base card and rounded off the corners. Next I cut a piece of brown card 1cm smaller on both sides and a off white piece of card another 1cm  smaller then the brown. The off white piece I then embossed, lightly distressed, added faux stitching around the edge and mounted it onto the piece of brown card. Across the centre I added a piece of brown ribbon and attached it to the base card.

In the centre of the card I attached the oval which I had mounted onto a larger scalloped oval. Around that I arranged and attached the cut out daisies and leaves.

To finish of the card I added stickles to the centre of the flowers and a bow and hat pins to the ribbon.

If you like our stamps, why not check out our website.

Saturday, 30 May 2015

Leafy Doodles

I just love our new Leafy Doodles stamp set, it is so much fun to work with and you always get great results!

Oh, and speaking of leaves our second batch of purple beans are growing brilliantly, we found the culprit who was re-homed! 


I seem to be stuck on these little cards at the moment, so to make this card I cut I cut an A4 piece of card in half long ways and folded it at 14.5cm long (trimming off the extra). 

Next I cut a piece of card 13.5cm by 9.5cm and stamped each of the solid leaves each in a different colour (2 greens and a brown) randomly all over the piece of card and attached this to the base card.

Out of the same colour card as the base card I then cut a narrow strip of card 2.5cm by 10.5cm and attached this to the base card too about 2.5cm in from the right hand side of the card. Around the left hand side of the card I wrapped some string.

Onto a piece of white card I stamped 1 of each of the solid leaves in the same colour that they were stamped onto the backing card and over the top stamped the detail leaf in black ink. I then cut these out leaving a small boarder.

Finally I arranged the leaves along the strip of card using foam pads, doubling up the foam pads on the centre leaf.

If you like our stamps, why not check out our website.

Tuesday, 26 May 2015

All About Lizzie....

I have been playing with the new Lizzie stamps and couldn't resist popping them all onto one card. 

BUT wait a minute I haven't used any Distress Inks!!!! Yep you read that right  - I will blame it on it being the school holidays and spending the last few days trying to sort out my jungle of a back garden! Normally my garden is kept in check and by this time of the year we have all sorts of veggies growing, but this year I just haven't had chance to get stuck in, until now! Only problem is I have lost a lot of my seedlings, and my tomatoes, well I don't even think the compost bin would want them, so Little Lady and I nipped to the garden centre to replace a few things! So I have ended up with a purple tomato plant and purple beans, a pumpkin and a few other random plants she decided we had to adopt.  I am not sure who is more excited about the purple beans Little Lady or the snails that have devoured then over night! Good job she is off to grannies tomorrow I can replenish the pot whilst she is out!

Anyway, back to the crafting I hope you enjoy this one.....


To make this card I started by cutting a piece of white card 13cm by 19.5cm. In the centre I stamped the original Lizzie and masked it off. I then added three leaves to either side and masked these off too (I worked on one side at a time so that I only needed three masks!). Then I created the stem/vine using the stem from Lizzie Doodles and added some colour to the centre of the flower and the leaves using (insert drum roll) pencil crayons! And added some doodle lines around the edge of the card.

Next I placed a piece of black lace across the centre of the card to get the position for the sentiment and stamped that.

I cut a piece of pink card and mounted the stamped images onto it, attached the black lace and mounted it onto an A5 white base card.

Next I stamped 1 of the medium sized Lizzie flowers and 2 of the smallest size onto pink card, highlighted the centres using a white pencil crayon and cut out. And then stamped 2 of the medium sized leaves and 2 of the smallest leaves onto green card and highlighted and cut out as before.

To finish the card I attached the flowers and leaves and added a few gems!

I really enjoyed making this card and it reminded me how much I enjoy masking, so I might just have to play some more.

 I hope you like our stamps, if you do why not check out our website.

Thursday, 21 May 2015

Which way up?

These little beauties are so quick and easy to make, but, I can not decided which way they should stand up!!! 

They are both made using the New Little Lizzie or Lizzie and Friendz. stamp set.

Or the New Little Daisy or Daisy and Friendz sets.


To make these cards I cut an A4 piece of card in half long ways and folded it at 14.5cm long (trimming off the extra). 

For the Lizzie card:
  1. I then stamped the smallest flower around the edge of the card coloured it in and distressed it. 
  2. Next I cut a piece of card 13.5cm by 9.5cm and tore a smaller piece of handmade paper to mount onto that. Onto the handmade paper I again stamped the smallest flower randomly (using 1st/2nd and 3rd generation images) and distressed all over the paper. This was then mounted onto the piece of card.
  3. Around the right hand edge/ bottom (depending which way your card is standing) of the card I wrapped a piece of lace, which had been distressed and over the top of it piece of ribbon.
  4. Onto some handmade paper I then stamped 4 of the smallest flower and 2 of the middle sized flower and 4 leaves, to these I added a little bit of colour using pencil crayons. These were then cut out.
  5. Once the flowers and leaves were cut out I then arranged them along the lace/ribbon attaching them with glue.
  6. To finish off the card I added a ribbon along the folding edge, a gem in the centre of each flower and in two visible corners. Finally I added 2 hatpins to finish it off.

For the Daisy card:


  1. I then distressed around the edge of the card. 
  2. Next I cut a piece of card 14cm by 10cm and a smaller piece one 13.5cm by 9.5cm of card. Onto the smaller piece of card I stamped the smallest flower randomly (using 1st/2nd generation images) all over the piece of card. Then coloured them in and distressed around the edge. This was then mounted onto the larger piece of card and a sliver brad added to each corner.
  3. Around the right hand edge/ bottom (depending which way your card is standing) of the card I wrapped a piece of lace and over the top of it piece of ribbon.
  4. Onto some handmade paper I then stamped 4 of the smallest flower and 1 of the middle sized flower and 8 leaves, to these I added a little bit of colour using pencil crayons. These were then cut out.
  5. Once the flowers and leaves were cut out I then arranged them along the lace/ribbon attaching them with glue.
  6. To finish off the card I added a ribbon along the folding edge and 2 hatpins to finish it off behind the flowers.

Monday, 18 May 2015

Paused

Well, what can I say it has been a while!!!!! 

But I have been busy, hopefully I will have bumped into a few of you out and about over the past couple of months whether it be at one of the Ross Papercrafts Shows or at Happy Stampers! It has been lovely to meet you all and share some ideas.

I have also been working on some new designs, which will be on the website shortly and more importantly I will be making samples with over the next few days. But in the meantime here is a little beauty Sue has come up with.....


And as a lot of you know Little Lady took part in her first dance show this weekend and she loved it and can't wait to do another one! As for Little man he is happily cruising around getting himself into all kinds of mischief.